And now for your daily dose of ASMR:
Metalworker and restorer my mechanics is best known for bringing rusty old machinery back to life. His YouTube channel is chock-full of restoration projects, but once in a blue moon, he decides to make something different.
Armed with the newfound knowledge of creating balls using a lathe and milling machine, he decides to take a break from restorations and makes an 8 ball out of stainless steel and brass:

The project consists of six pieces: two brass tubes form the inner circles of the “8” symbol, two stainless steel tubes to hold the brass tubes, a brass piece serving as the light circle in which “8” resides, and a stainless steel ball.
Making A Basis for 8 Ball Body

To start things off, my mechanics takes a good chunk of solid stainless steel and drills a hole in it with his lathe. This will house the rest of the 8 ball’s parts and will help him determine their measurements.
Crafting “8”

This is where the meat of the project takes place. My mechanics lathes two tubes of stainless steel: one for the upper circle and one for the lower circle of the “8”. These steel tubes are fitted with two cylindrical pieces of brass.
To get the metal pieces to fit in with as little space between them as possible, my mechanics makes the shafts 0.03 mm bigger than the holes they are supposed to fit in. He heats up the tubes using a blow dryer before taking the pieces to a hydraulic press and fitting them in.
Fitting “8” Into the Light Ball Circle

With the “8” complete, he can now fit it into a light brass piece. He starts by drilling a hole for the larger part of the “8” to fit in before hitting it with some heat to make the pressing process easier. Then, slowly but surely, he fits the bottom part of the “8” into the brass.

He didn’t just make two holes for both pieces to fit in so he can cut off a layer of brass and steel to make the overall piece look more cohesive. Once he removes the top layer, he begins drilling a new hole on top and repeats the same fitting process for the rest of the symbol.

He shaves another layer off the top before cutting the brass piece into its final shape.
Turning the Ball Shape

After pressing the brass into the stainless steel body, my mechanics ore-turns the piece into a ball shape. This cuts a number of circles onto the body which gives it a rough, spherical appearance.
He takes this ball to his milling machine and sets it at an angle where it can start shaving off metal from a different position. The various cuts help bring out the smoothness in the ball, which is only emphasized once my mechanics sands it with a 120-grit, a 240-grit, and finally some 400-grit sandpaper.
Cutting and Polishing

He gives the 8 Ball a pass with some Scotch Brite before cutting it off from the excess steel. The flat nub is then uniformly lathed, filed, and sanded to match the rest of the eight ball body.
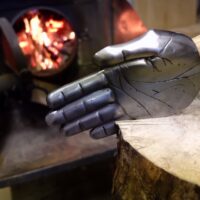
To finish the whole thing off, the 8 ball is taken to a buffer where it can get a mirror polish and be ready to serve its duty as a glorified paperweight.

To be honest, you can’t really use this 8 ball in a game of billiards. Apart from being too heavy, its sheen can confuse players and throw them off with the glare. If my mechanics decides to use this ball in an actual game, he would definitely have to make the rest of the balls in the set out of the same material (and maybe wear some shades, too).
It took him four days and roughly $25 to make this 8 ball, so here’s to hoping he makes the rest of the set!