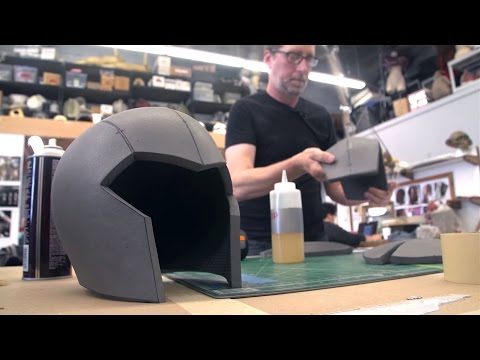
Yeah, you know any old helmet won’t do. And you definitely know that Lannister guard helmet you fashioned from a paper bag, gorilla glue and wood chips is looking pretty weak right now. Well, there’s a better way to make a helmet and you won’t believe how simple it is. This week on Tested, the process-crazed crew is joined by armor maker extraordinaire Evil Ted Smith, for a breakdown on how to easily build the base for your very own, pro-level cosplay helmets.
Evil Ted, who is spectacular at going into great detail about how he makes things on his on Youtube channel, has learned a few things over his career as a Hollywood prop and costume maker, and after seeing him at work I’m sure you’ll agree he’s the master of forming foam. What’s different about his videos is how he does it all in real time–no jumping ahead, speeding up or taking the finished one out of the oven. For this helmet making process he spends 21 minutes going from pattern to finished base, ready for more features or sealing and paint. Here’s the step by step process with all the materials you need.
MATERIALS
How to Make a Cosplay Helmet from Foam
1/2″ Foam Floor Mat
Barge Infinity Cement (non-toxic)
Heat Gun
Exacto Knife
STEPS
Step 1: Make your pattern
How do you make an helmet pattern? Evil Ted says it’s similar to making a cloth pattern. Use aluminum foil and duct tape to get the head shape. Then cut it into symmetrical sections and lay flat. Transfer to thick paper or card stock–something that allows you to save, re-use or adapt the pattern. The trick is adding ‘registration marks’ so you can line the pieces up when gluing. (Ted has some patterns for sale on his website here.)

Step 2: Transfer Pattern to Foam
Once you have the flat pattern, space the piece out and pin them to the foam. The foam is your standard 1/2″ foam exercise mat. This material can be easily shaped, heated, sanded, glued and painted. Transfer the pattern with a Sharpie marker. Be sure to add the registration marks so the foam pieces fit together when you go to glue them.

Step 3: Cut Foam
Using an Exacto knife, cut the pieces out of the foam. It’s handy to have a self-healing cutting mat as well. Be sure to keep the knife at a 90 degree angle to the foam so they match together without creating a sharp crease. (Incidentally, that is exactly how you can create sharp creases with the foam.)

Step 4: Heat foam
Since the foam is a bit stiff, a little heat loosens it up, making it easier to glue and match up the registration marks. Heat each piece evenly, front and back, on the high setting for a couple minutes. Mold each piece with your hand until you get a slight curve.

Step 5: Glue Foam
Using the Barge Cement, glue the edges to be connected. Barge Cement has a great working life, allowing you to spread and take your time lining up the registration marks and making sure everything is all flush. It also dries flexible preventing those hard seams that can sometimes break.


Step 6: Test Fit!
Once you’ve got the top and sides together, give it a test fit! This is where you can start adding some foam inside for padding, trimming back areas or marking areas for additional helmet features. The mat foam can be cut and sanded, shaped and glued on for other features. Craft foams also come in different thicknesses and can be easily cut a glued tothe helmet base prior to painting.

See more armor building and foam process work on Evil Ted’s website or Youtube channel.