The Onshape guys think Part Studios set them apart from other multibody CAD systems. I’ve been skeptical. After a few weeks of testing, I have some thoughts.
It’s the summer of 2014. I’m on the phone with Scott Harris, who just finished walking me through his Part Studio demo with the telephone-equivalent of jazz hands. An awkward pause follows as I scrunch my brow and look off into the distance. I hear what I think may be a lone cricket chirping somewhere far away. (For a longer demo: Onshape multipart webinar.)
A: How is this different from any other multibody part file?
S: Because you can add them to an assembly.
A: Uhm. I can do that in SolidWorks.
S: No you can’t.
A: Yes I can.
S: Nuh uh.
A: Nuh huh.
S: Nuh uh uh.
A: Nuh huh huh huh.
This went on for a long time.
Multi-wha?
MCAD geeks can skip this section. For everyone else, a little context.
Mechanical CAD (MCAD) systems have traditionally divided the design process into two main tasks: part design and assembly design. Think of a car: it’s an assembly made up of thousands of individual parts. CAD systems were designed with this paradigm as the primary data management metaphor: an assembly file organizing the car as a whole, and thousands of part files for each and every part in the assembly.
Old-school CAD systems were single-body part systems. One part file could only contain a single contiguous chunk of solid material. One part = one file = one lump of material in the physical world. Simple.
In the mid 90’s we started seeing multibody systems. These allow the user to create more than one hunk of material in a single part file. At first that may seem counter-intuitive, as the one-file-per-part paradigm was simple and (at the time) intuitive. In practice, however, there are lots of reasons why an engineer might want to create more than one solid body in a single part file.
The reasons multibody became important are esoteric and irrelevant. If phrases like “complex sequential boolean operations” or “deeply interdependent parametric relationships” are not your thing, what matters is that multibody part design was a big improvement for many mechanical CAD design situations. Multibody isn’t the answer to every problem, but it’s a powerful tool in the hands of a skilled modeler.
So yeah, on second thought the above is really more like a multi-body part (cut up pig) becoming a single body part via boolean union (whole pig). An assembly, then, would be a duck riding a pig riding a horse. I said it was a bad analogy. Stop asking stupid questions.
Part Studio vs. Multibody: Part Modeling
Back to Onshape.
When Scott first demoed Part Studios to me, my reaction was confusion. Isn’t a Part Studio just a multibody part system? Well, let’s break it down.
Let’s say we’re modeling a hinge.
In a single body part system, you would have to model each half of the hinge in a separate part file. Working this way is robust but an inherently technical process, often involving spreadsheets, variables, or surface body imports.
By contrast, in a multibody system you can design both halves of the hinge in a single parametric environment. Any change you make to the barrel updates both halves simultaneously, and you can see the change’s effect on both of them at once. (There are reasons why I tend to only do this in very simple cases, but let’s leave those aside for the moment.)
When it comes to basic solid modeling, a Part Studio is ostensibly the same as any other multibody system. Mostly.
Since Part Studios were designed with multipart design in mind from the beginning, the feature creation tools in Onshape are all inherently multipart. In SolidWorks, they are not. For example, a single Fillet feature in SolidWorks can only affect edges on a single solid body, even in the context of a multibody part. In Onshape you can do them all at once.
This might seem trivial, but nearly all features in Onshape are inherently multipart. Want to extrude multiple profile sketches at the same time to create multiple bodies in one feature? Do it. Even the Move Face command allows you to select as many faces on as many different bodies as you want in one go. When you can apply features to multiple bodies at once, you quickly find yourself thinking differently about the whole modeling process. It’s freeing.
So yes, there are some nice conveniences for part modeling in Part Studios that aren’t always available in traditional multibody systems. But part modeling is only the beginning, and this is where a Part Studio starts to pull ahead.
Part Studio vs. Multibody: Assembly Basics
Now we want to do a motion study to show how our hinge moves in the context of a larger assembly, and for that we’ll need to bring our hinge halves into an assembly file. This is where a Part Studio diverges from humdrum multibody systems, and where I think real workflow improvements are possible.
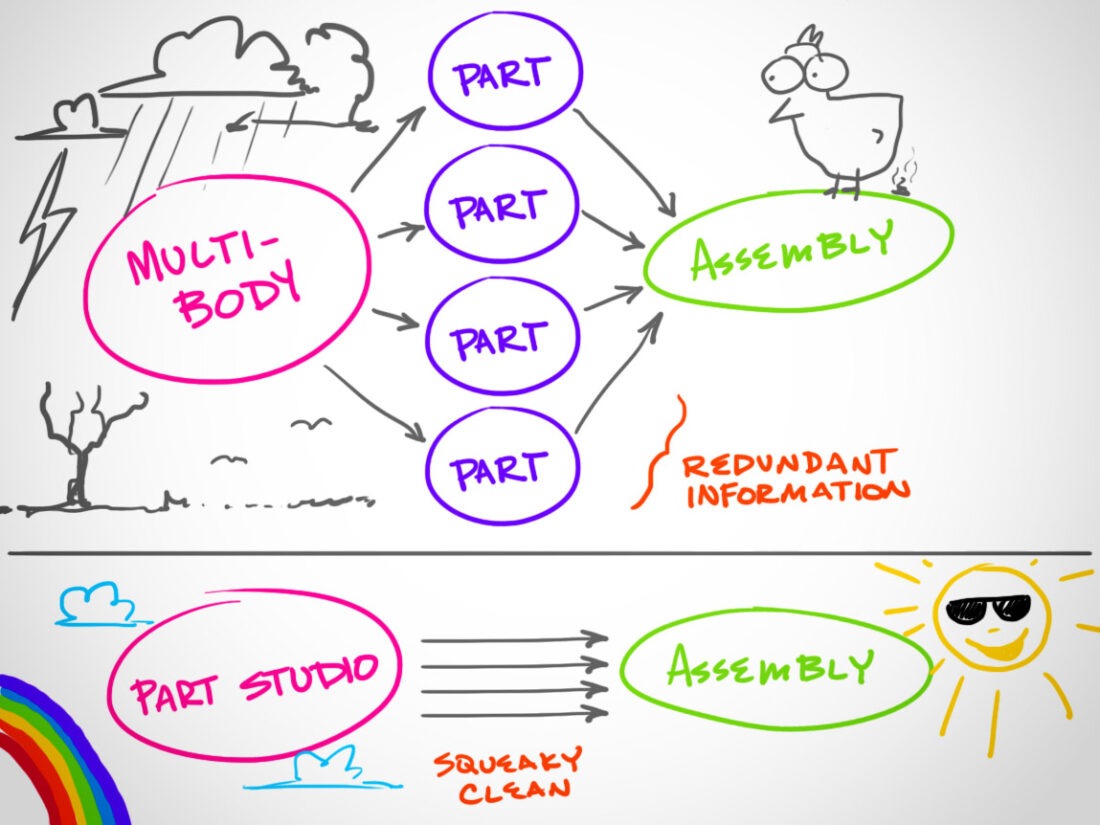
In a multibody system, we would have to export our hinge halves to separate part files before importing them into the assembly. This means that we now have four files to manage: the master part file containing both halves,the two split part files containing each individual half, and an assembly file articulating them.
In a Part Studio you can insert the individual halves of the hinge directly into an assembly. No fuss, no muss, just insert and done. In multibody we needed four separate files to make a simple hinge assembly.
How many files do we need to do the same thing in Onshape? If we consider a Part Studio the functional equivalent of a part file in desktop CAD, then Part Studios have just done with two “files” what multibody desktop CAD needed four files to accomplish, and that’s just for a single hinge.
Anyone who has ever built assemblies with dozens, hundreds, or thousands of components will know that trying to manage multibody part files in a complex assembly is almost exactly as appealing as death-by-sticking-your-head-in-a-microwave-oven. (RIP DFW)
Part Studio vs. Multibody: Mechanical Changes
So now we’ve created our assembly, and we decide after reviewing the motion study that we really need a two-point hinge with three separate pieces–oh, and last time we forgot to include the pin in the hinge, so this time we’ll include those too. So now we have a total of five bodies in our multibody part file, but only two of them are being spat out to part files for use in the assembly. Grr.
Now we have to edit the feature that exports those part files, making sure that the correct bodies are being exported to the existing files while also creating new ones as necessary. Then we go to our assembly and add in the new part files. We now need seven separate files to make our multibody part file into a workable assembly.
Imagine a giant hairball you just pulled out of the clogged shower drain. You now have a perfect visual for how multibody-to-assembly workflows play out in practice.
In Onshape it’s easy. Just add the parts you want to the Part Studio, then drop them into the assembly. Done. No separate “split” features or master model imports, no piles of redundant part files with complex interrelated cross-references. Clean and simple.
Part Studio vs. Multibody: Tops Down, Bottoms Up
Have you ever heard of the “Layout” toolbar in SolidWorks? (In a room of a hundred SolidWorks users, three raise their hands.) How many of you actually use the Layout tools in SolidWorks to design mechanisms? (All hands go down.)
The Layout tools in SolidWorks are meant to facilitate what’s known as a “top-down” design approach for mechanical systems. Without getting too technical, CAD geekery lumps design strategies into two overarching categories: top-down, and bottom-up.
Top-down strategies begin with a big idea and work down into progressively finer detail, adding individual components as needed to facilitate the broader vision. It works well when designing things from scratch.
Bottom-up strategies are just the opposite, usually beginning with a bag of off-the-shelf parts and assembling them gradually into a larger mechanism. Top-down and bottom-up methodologies are both useful, and most designs require a bit of each.
Top-down design in multibody CAD is tricksy, especially in a team environment. CAD systems have tried for decades to work around this inherent limitation of file-based CAD, and yet I still have to teach week-long seminars on the topic. The Layout tools in SolidWorks are an example of this effort. It tries to allow you to divorce the mechanical design process from the geometry design process. It may seem simple in a canned demo, but it’s a jungle out there, folks. Shit gets weird.
Assembly First, Parts Later
The Part Studio paradigm dispenses with the need for kludgy workarounds like the Layout tools in SolidWorks. In Onshape you have the option of working with traditional multibody CAD strategies, but it opens up a powerful new possibility: a Part Studio can effectively separate the mechanical design process from the geometry design process.
Here’s an example. First you lay out your mechanisms using a simple 2D sketch. No details are needed, just a few lines to indicate where the moving parts lie and how they connect with one another. Next, use that sketch to extrude a few simple place-holder blocks, one for each component. These can be simple rectangular extrusions. Now–and here’s where we diverge from traditional multibody CAD–we add those blocks directly into an assembly. No separate files needed, and no fear of downstream consequences.
But how do we connect the blocks together for motion studies? We don’t have any geometry to mate together. This is where the power of mate connectors comes into play. Back in the Part Studio we can add mate connectors to the layout and assign them to the output bodies. In the assembly we can use those mate connectors to mate our parts together into a working assembly–all without ever building a single mechanical detail in the geometry itself.
Onshape’s Part Studio allows for true top-down thinking, letting you explore mechanical options without the need to build detailed geometry just to test an idea.
This is a huge advantage, and one that will only get more powerful as mechanical mate connectors of various kinds are added into Onshape. Once you like the mechanism, you can add geometric detail gradually without breaking the mechanical assembly.
Top-down design was an afterthought in multibody CAD. In Onshape, it’s built in from the beginning.
Does it Really Matter?
There’s no question that a Part Studio has some really nice convenience features over traditional desktop-bound multibody part files. Once you get used to being able to apply features across multiple bodies simultaneously it’s really hard to go back.
Like multibody modeling before it, it’s a big step forward in the history of parametric CAD.
As with most things, the proof is in the pudding. All hand-waving, beard-scratching, and belly-thumping aside, I’ve been using Onshape in test projects for quite a while now, and going back to old school multibody part systems is painful.
In the end, I have to admit defeat: the Part Studio is better by far.
The more I work with them, the more I appreciate the many subtle differences that add up to a better overall experience.
Some projects are best approached top-down, bottom-up, with a master model or interface control document, or a combination of all of these. The Onshape Part Studio vastly improves the top-down workflow, and with the recent addition of linked documents, we can now do true bottom-up design as well, but in a much more robust and straightforward way than a file-based part library could ever offer.
The Part Studio is indeed different from traditional multibody CAD, and so much for the better. It’s not revolutionary, but it’s certainly a welcome evolution with very real advantages.
Scott, I’m sorry. I was wrong. (Grumble grumble grumble…)




![6 Types of Civil Engineering Drawings [Detailed Guide]](https://www.solidsmack.com/wp-content/uploads/2023/12/Civil-Engineering-Drawings-270x180.jpeg)
